At first, I thought Java has very good support for audio as I found many ways of playing audio. Just a simple google search for playing audio in java would result in many articles explaining various ways of achieving this. If you are looking for just a simple way of playing a small bit of audio, then this article is NOT meant for you! I write this article to explain how I solved the problem of playing the audio files which the in built API's can not handle. Also, this article is an extension to this hack.
The built in API of java can not handle audio files larger than 5mb. I googled a lot to find other alternatives but, unfortunately there isn't much support for audio in Java. After hours of searching, I found this hack which is a part of many hacks, tips and tricks while working with Java Swing originally from the book "Swing Hacks" written by Joshua Marinacci and Chris Adamson.
Let me start by showing you how .wav file is organized internally,
 |
| Internal structure of Microsoft wave sound file Source: https://ccrma.stanford.edu/courses/422/projects/WaveFormat/ |
a detailed explanation of the wave file format can be found at Sonic Spot - " Wave File Format"
What I have been able to do so far:
- Play/plause/stop large audio files ( > 5 Mega Bytes ) encoded in Pulse-code modulation (PCM) format ( stored as .wav file ).
- Attach UI components ( javax.swing.JButton, javax.swing.JSlider, javax.swing.JProgressBar ) as an extension for GUI interaction.
- attach UI Container ( java.awt.Container) to display the wave form.
What is still left:
- Seek functionality, for more interaction.
* Update#1*
A preview of the API that I am working on now.
java.io.File audFile = new File("/path/to/wave/file.wav");
// create an instance of NonTrivialAudio
NonTrivialAudio audio = new NonTrivialAudio(audFile);
// display the header information
System.out.println("Header information: "+audio.getHeader());
// start playing the audio
audio.start();
// pause it
audio.pause();
// stop the play
audio.stop();
sample output for the above code
Header information:File size: 224044 Bytes
Header Size: 44
00-03 Letters                 : RIFF
04-07 Length of rdata chunk   : 224036
================ rdata chunk ===================
08-11 Letters                 : WAVE
=============== format chunk ================
12-15 Letters                 : fmt
16-19 Length of rest of chunk : 16
20-21 WAV Format Tag          : 1
22-23 Number of channels      : 1
24-27 Sample frequency        : 16000
28-31 nAvgBytesPerSec         : 32000
32-33 nBlockAlign             : 2
34-35 wBitsPerSample          : 16
================ data chunk =================
36-39 Letters                 : data
40-43 Length of following data: 224000
44-224044 (data)
Add UI elements for additional interactivity:
// create an instance of AudioUI
AudioUI myAudio = new AudioUI();

// initialize swing components
javax.swing.JScrollPane myScrollPane = new JScrollPane();
javax.swing.JButton stopAudio = new JButton();
javax.swing.JButton playAudio = new JButton();
// ... code

// Hookup swing UI components for UI interactions

// myAudio.setUIWvContainer(myScrollPane); //Check update#2

myAudio.setDisplayContainer(myScrollPane);
myAudio.setUIPlay(playAudio);
myAudio.setUIPause(stopAudio);

// ... some more code

// setting source to AudioUI
 java.io.File audFile = new File("/path/to/wave/file.wav");
 myAudio.setAudioFile(audFile);
A demo application which makes use of the above code
 |
| AudioUI demo |
* Update #2 *
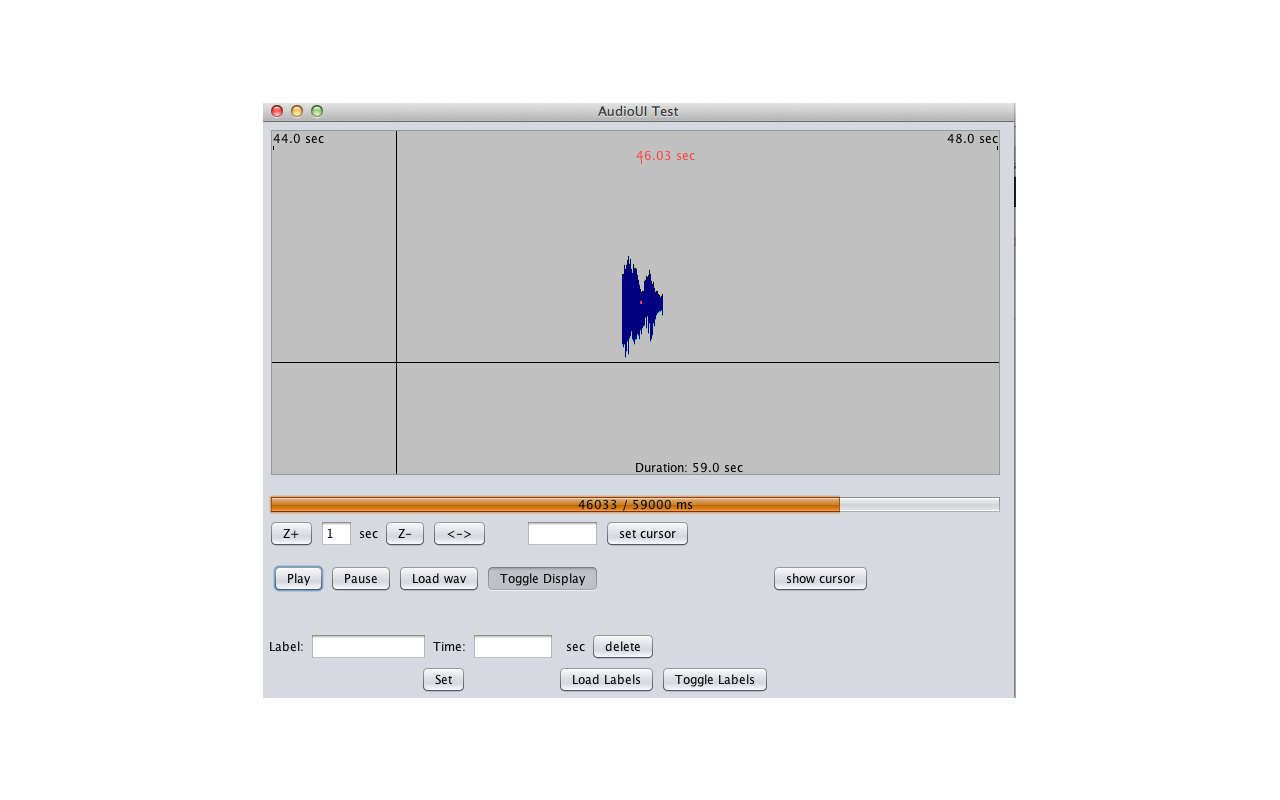
A lot has been done after the first preview. I am attaching the screenshots below
Working with the 'Wavform' display:
Setting up the zoom level i.e., display length
int defaultZlevel=7; // in seconds
// if requested Zlevel is not available, the maximum available will be used
myAudio.getDisplay(AudioDisplay.TYPE.WAVEFORM).setZoomLevel(defaultZlevel);
Zooming
int zStep = 1 ; //seconds
myAudio.getDisplay(AudioDisplay.TYPE.WAVEFORM).setZoomStep(zStep);

myAudio.getDisplay(AudioDisplay.TYPE.WAVEFORM).zoomIn(); // zoom in one 'zStep'

myAudio.getDisplay(AudioDisplay.TYPE.WAVEFORM).zoomOut(); // zoom out one 'zStep'

myAudio.getDisplay(AudioDisplay.TYPE.WAVEFORM).resetZoom(); // resets the zoom -- display the whole track
Refresh the display after every update.
myAudio.getDisplay(AudioDisplay.TYPE.WAVEFORM).refreshDisplay();1: Adding Labels to audio track
String label = "MyLabel";

Double pos_in_sec = 1;
myAudio.getDisplay(AudioDisplay.TYPE.WAVEFORM).setLabelAt(label, pos_in_sec);
// No refresh necessary, labels are automatically loaded

2. Editing labels:
You can edit the the labels once you have loaded them into the display.
By enabling label editing you can, change the position of the labels on the current track. As shown in the screenshots below
myAudio.getDisplay(AudioDisplay.TYPE.WAVEFORM).editLabels(true);
Get the label at the current position of the mouse *inside* the display
Label labelAtPos = myAudio.getDisplay(AudioDisplay.TYPE.WAVEFORM).getLabelAtXY(evt.getX(), evt.getY());
// 'evt' is the object of java.awt.event.MouseEvent
Now change the position of the label
if (labelAtPos != null)
     myAudio.getDisplay(AudioDisplay.TYPE.WAVEFORM).setLabelAtXY(l, evt.getX(), evt.getY());

Toggle the display of labels
myAudio.getDisplay(AudioDisplay.TYPE.WAVEFORM).toggleLabels();
You can also change the length of the crosshair ( the dark blue portion) that surrounds the current play position, the little red dot -- the pulse.
myAudio.getDisplay(AudioDisplay.TYPE.WAVEFORM)setCrosshairLen(crosshairLen)

This is my favorite visualization: I call it the 'ECG' display of audio (as it shows *only* the current play position -the red dot and its vicinity in blue).
The screenshot gives the view of it, but it looks a lot cooler in action ;)

You can find some more screenshots below :

 |
| Add caption |

Further updates will be posted here